Welcome To Your EssentOne Free Trial Guide!
The guide is designed for you to create a dropship Sales Order and then advance it all the way to completion. You'll create the order, add items, generate purchase orders, and create an invoice.
Along the way, you'll notice that information from one step automatically flows to the next step, which greatly reduces data re-entry to create an efficient transaction lifecycle. It's also all contained in one fully integrated system instead of the multiple disconnected systems that many companies use now.
Before We Begin
- It's important to go step by step. We know you're eager to hop around and try everything that EssentOne has to offer. But let's start with the basics! The Trial Guide outlines a process. And just like your real-life orders, it wouldn't make sense to mix-and-match steps like invoicing an order that doesn't even exist yet. Once you're familiar with the basics, then we can show you more and more.
- The Trial environment is a sample environment. The data is sample data, and all of the transactions are only sample transactions. So there's really no downside if you make a mistake, although we do highly recommend that you stick to the Guide so you can get a feel for the system first.
- There's so much more the system does. While the Guide provides a sample of the capabilities of EssentOne, it is far from representing all that EssentOne can do. You're encouraged to speak with an Essent representative to find out exactly how the system can fit your needs.
We hope you'll enjoy getting your hands on EssentOne and beginning to see firsthand how it can make your business more efficient.
Ready to get started?
Enter the Trial
And follow the Guide below
Need a hand or want to know more?
Get in touch with an Essent representative.
Free Trial Guide
Guided Tours
When a guided tour pops up in a green box, feel free to follow it to take a look at some of the things you can do in EssentOne. In order to have as much guidance as possible, we recommend that you do not turn off the Guided Tour.
Explore the Quick Add Menu

The Quick Add Menu is highlighted in the upper right.
The Quick Add Menu is a convenient way to add information, create orders, and do more no matter where you are in the system. It's the blue plus sign at the top right of your screen. Open it to see what's available.
Try the Universal Search
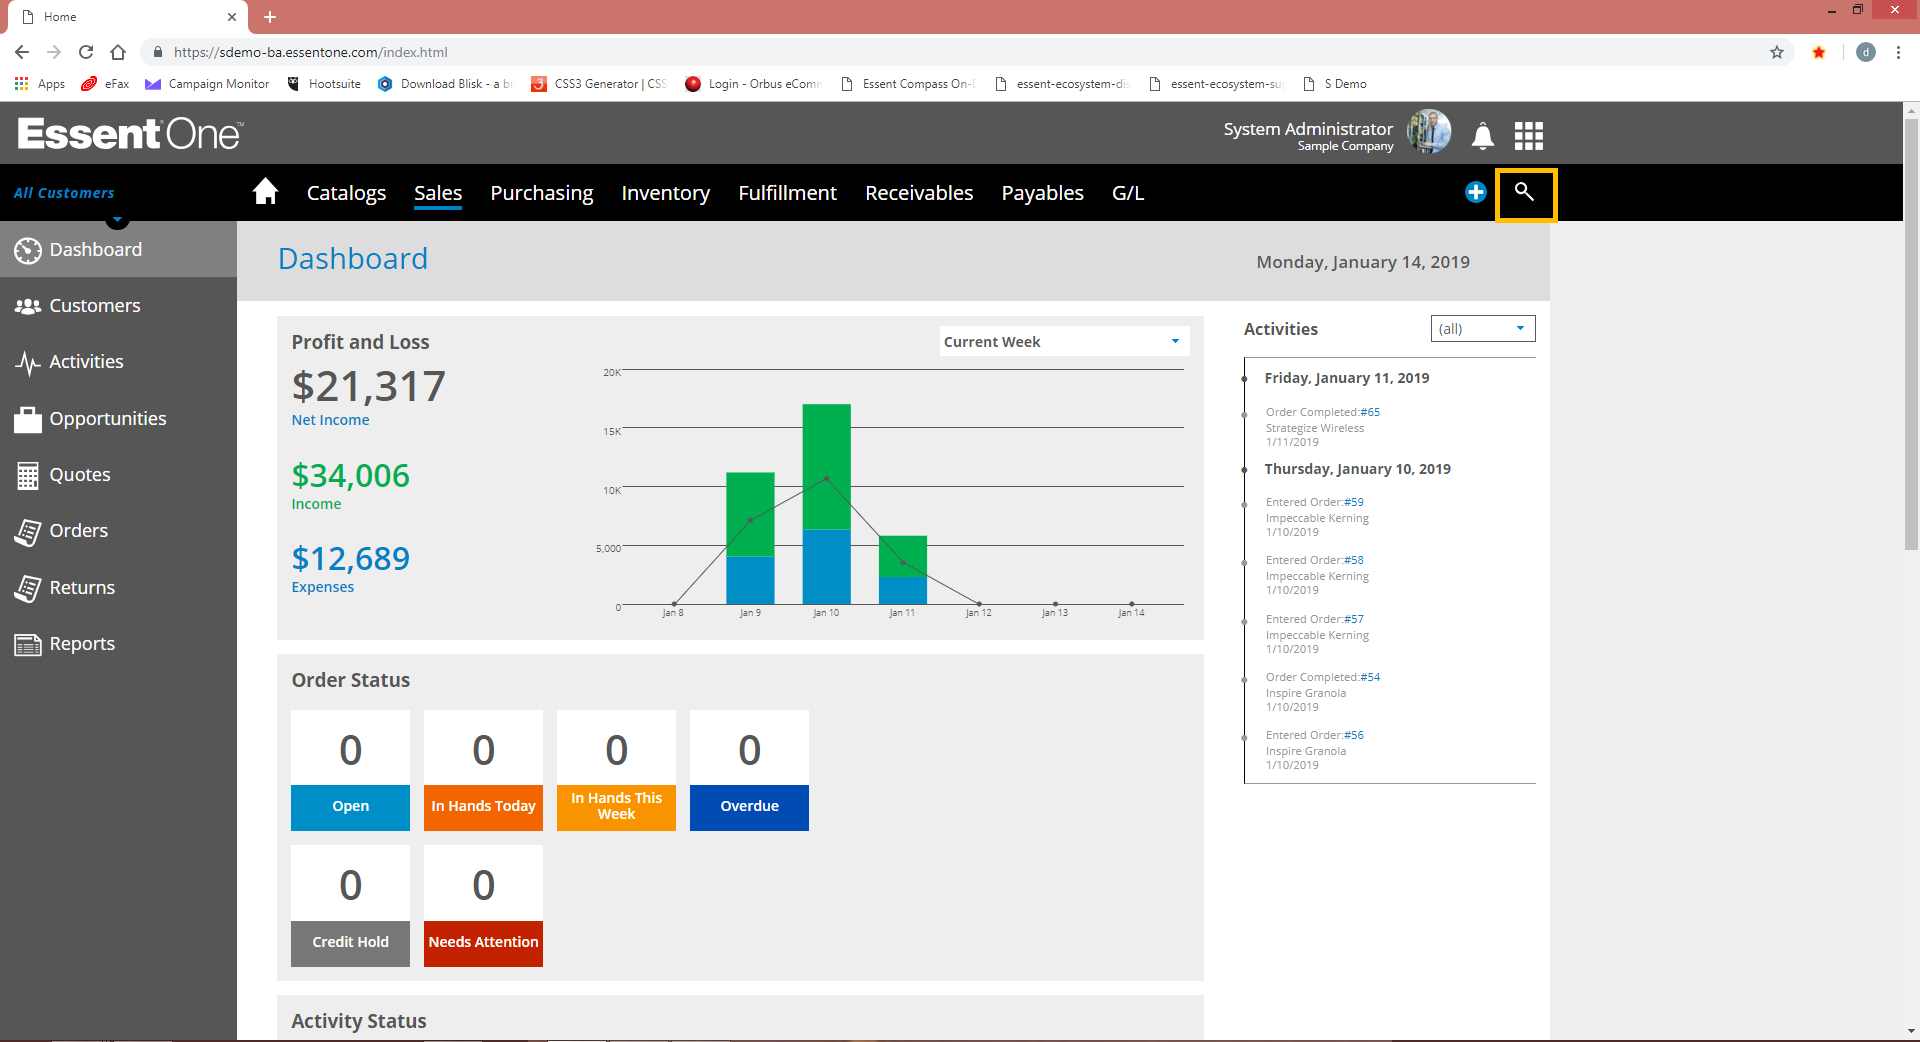
The Universal Search is highlighted in the upper right.
Quickly find Activities, Sales Orders, Quotes, Opportunities or Customers with the Universal Search. It's the magnifying glass at the top right of your screen.
Open the Universal Search. Choose Customers from the drop down. And type in "Inspire," which is one of the customers already in the system. (Once you create Activities, Sales Orders, Quotes, and Opportunities, you'll also be able to find those with Universal Search.)
Explore the Area Bar
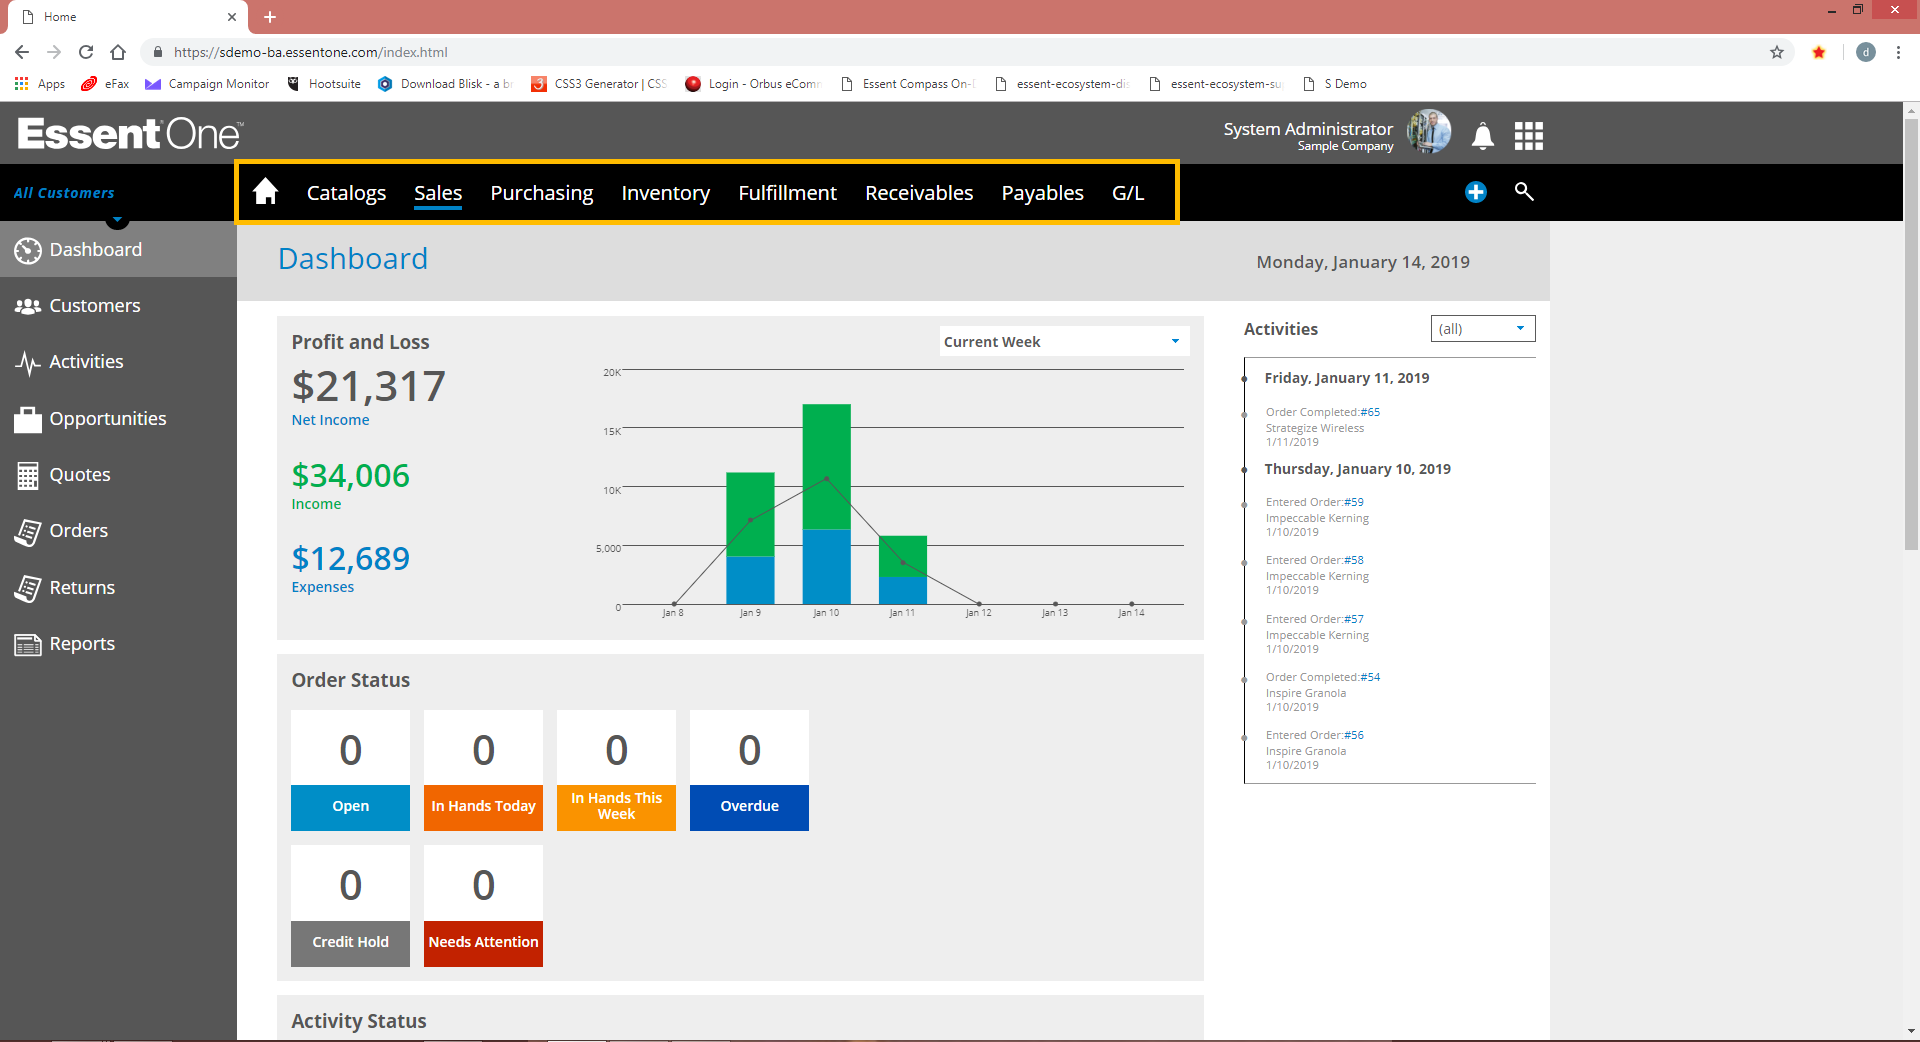
The Area Bar is highlighted across the top.
The Area Bar takes you to different areas of the system like Catalogs, Sales, and more — all the way out to Accounting. It's usually the black bar across the top of the screen, but on mobile views it can in a hamburger menu at the top left of the screen. Choose a few Areas and see what's there. Note that permissions control who can see what area; everyone has full permission in the Trial.
Try the Menu Bar

The Menu Bar is highlighted at the left.
Each Area has its own Menu Bar. It's typically down the left side of the screen, but on mobile views it may be at the top left in a hamburger menu. Within each Menu Bar are certain Views (which show information) and Actions (such as creating a new Order). Explore the Menu Bar within a few different Areas to see what's available.
Let's Create a Sales Order
Now that you've had a look around, let's create a Sales Order, beginning with a Quote.
Begin a Quote/Sales Order
The Sales, Quote, New Quote, the Slide-In Search and the Search button are highlighted.
Choose Sales from the Area Bar. Choose Quotes from the Menu Bar. And then choose New Quote.
Choose a Sold-To Customer and then a Sold-To Contact by using the magnifying glasses in those fields. The Slide-In Search will appear. Don't choose any criteria for now, just hit Search and customers will pop up. Choose any customer and contact.
Optionally explore the Tabs such as Header, Items, and Shipping to see what's available.
Add Items to the Quote/Sales Order
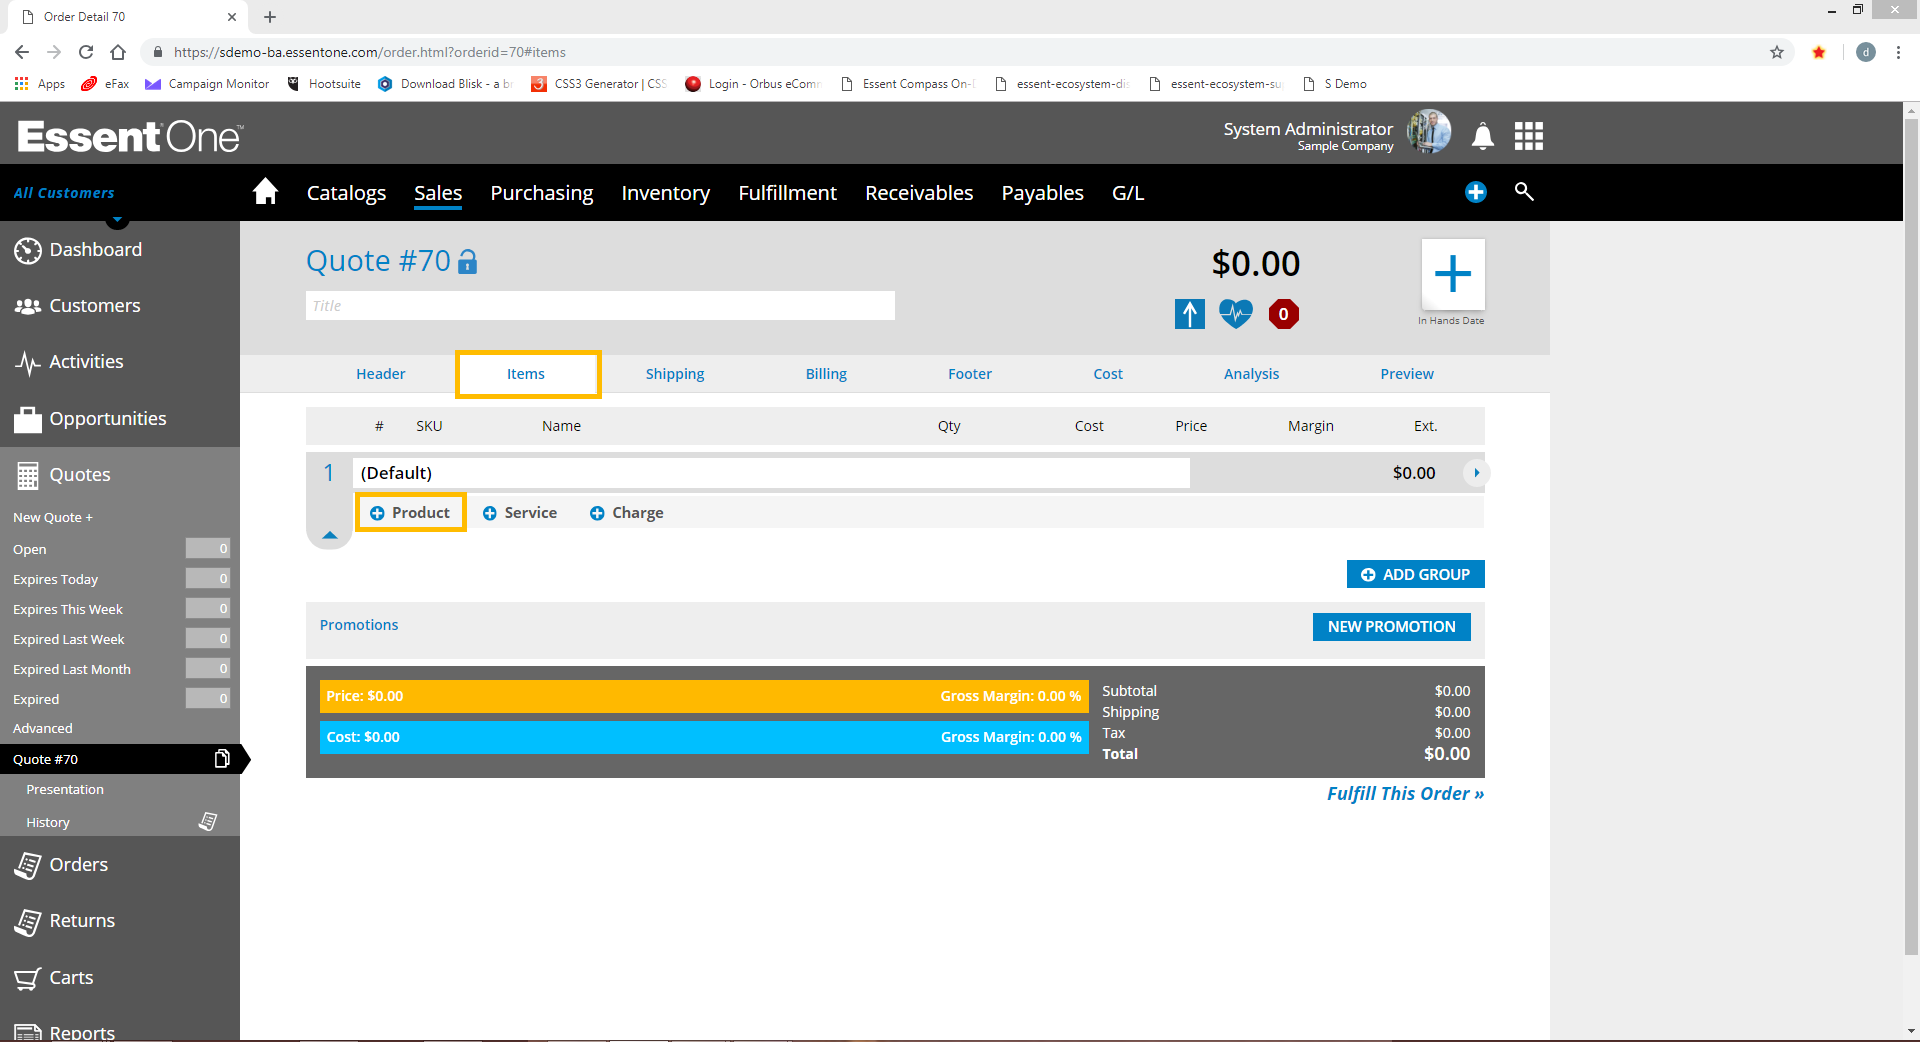
The Items Tab and the +Product button are highlighted.
In the Items Tab, choose +Product. Notice you can choose products from your own Catalog, from leading product research engines, or create a Custom product. Please note that the product research engines are not turned on in the Trial enviornment.
Let's pick from our own Catalog for now. Choose the Drinkware category, the Tumbler subcategory, and the Stainless Steel Tumbler product.
Enter any quantity. Enter or adjust the cost, price and margin. And choose Add To Order. You now see the items in the Sales Order.
Adding More
For now, let's move forward with just the single item.
But know that you're able to add as many products, services, and charges as you want.
You can also create groups with the Add Group button. For example, it might make sense to put one product and its services in one group but another product and its services in another group.
Later, you may want to try a Quote and Order with a whole range of products, services, charges, and groups.
Advance the Sales Order
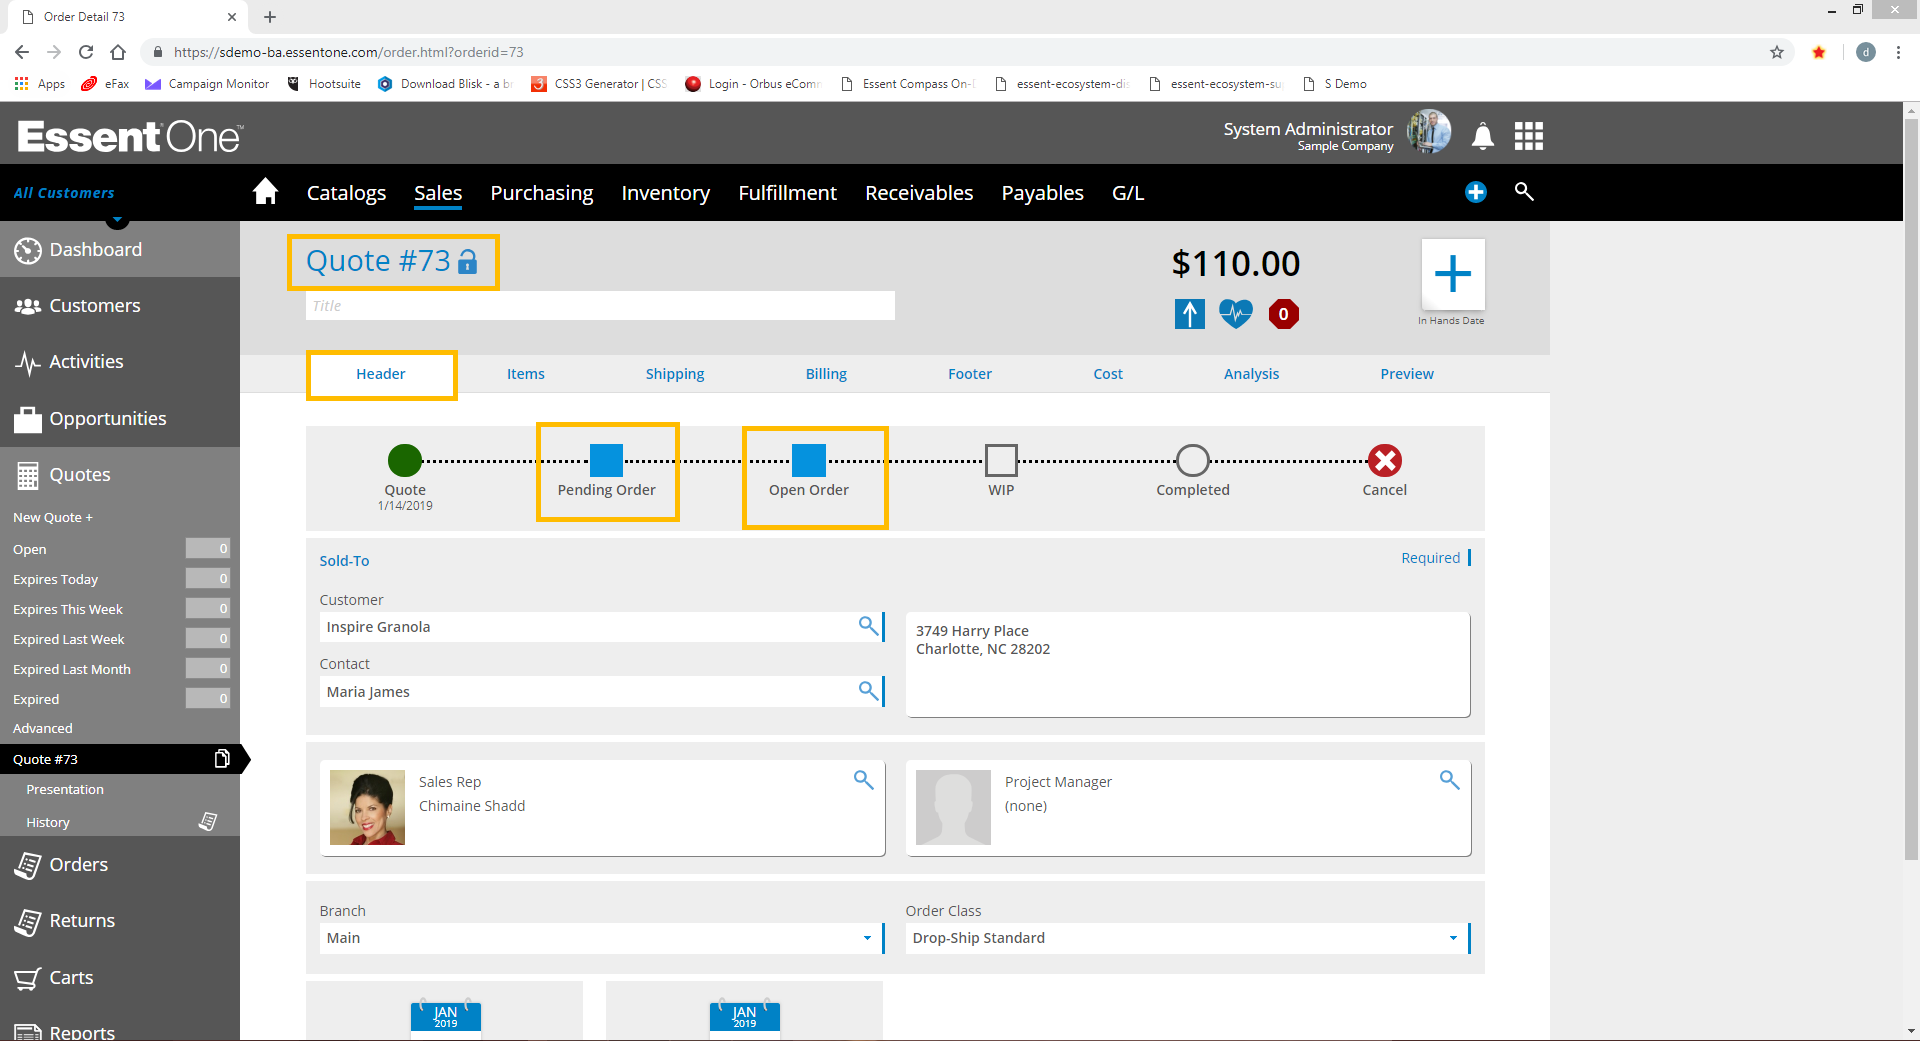
The Header Tab, Pending Order button, Open Order button, and Quote/Order Number are highlighted.
Let's move forward with the Quote/Sales Order.
Return to the Header Tab. Choose Pending Order and Confirm to make this Quote a Pending Order. Then Choose Open Order and Confirm to make this an Open Order.
Take note of the Quote/Order Number. We'll need it later.
Let's Create a Purchase Order
Next, let's create a Purchase Order.
Simply Create a PO
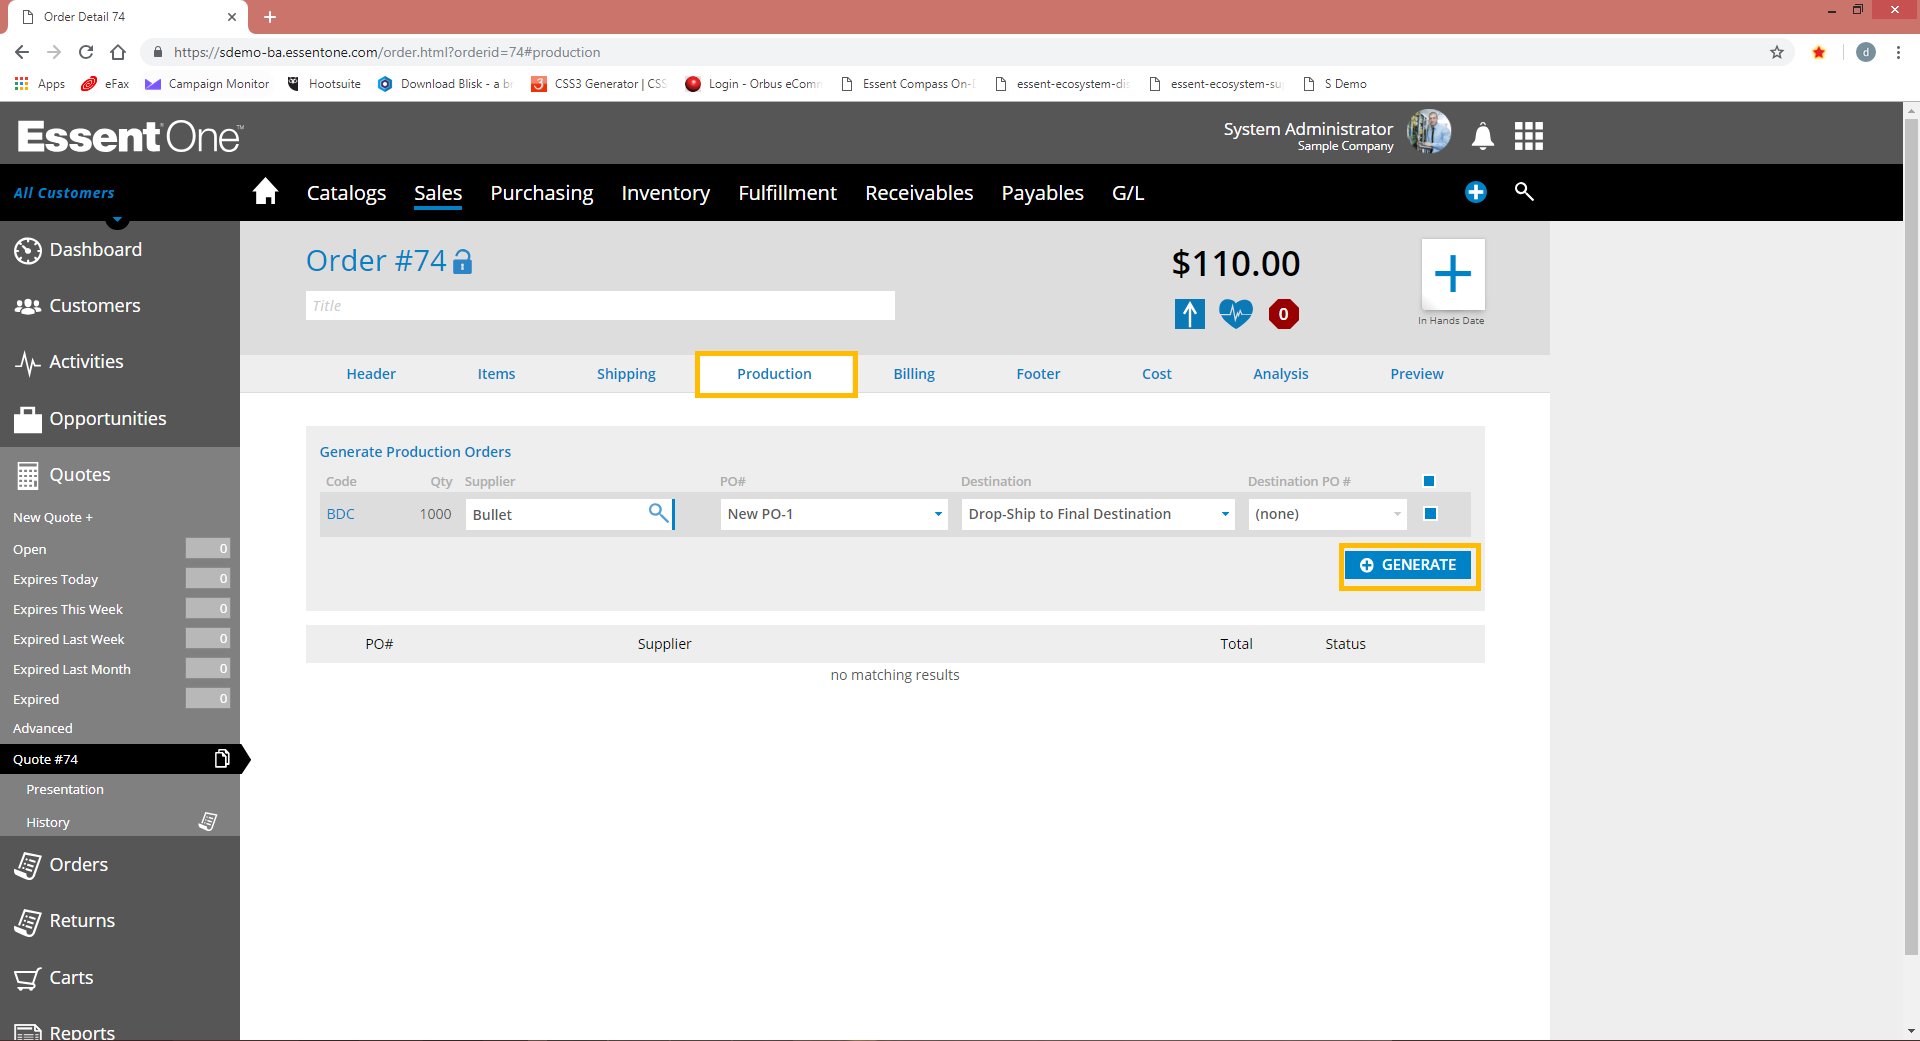
The Production Tab and Generate button are highlighted.
Within the same Sales Order we just created, choose the Production Tab.
The supplier, PO numbers, and destinations can all be edited, depending what's in the order. This becomes very handy when there's more to manage than just our one item.
For now with our single item, simply choose Generate to create the PO.
Click or tap the PO # to see its contents.
Finally, like we did with the Sales Order, choose Open and Confirm so that it's an Open Purchase Order.
Take note of the PO Number. We'll need it later.
Sequenced Production
If there were multiple items on the order, you could easily create multiple POs to multiple suppliers with multiple shipping destinations, all by using the choices in the Production Tab. This is ideal for the complicated logistics that are often included in custom product sales.
If you like, create a Sales Order later with a whole array of products and services and then see how much complexity the PO generator can truly handle.
Let's Give Accounting a Try
A major advantage of EssentOne is that data flows automatically into Accounting. Because Accounting is integrated with Sales and Operations, large portions of Accounting are handled automatically.
Create a New Bill
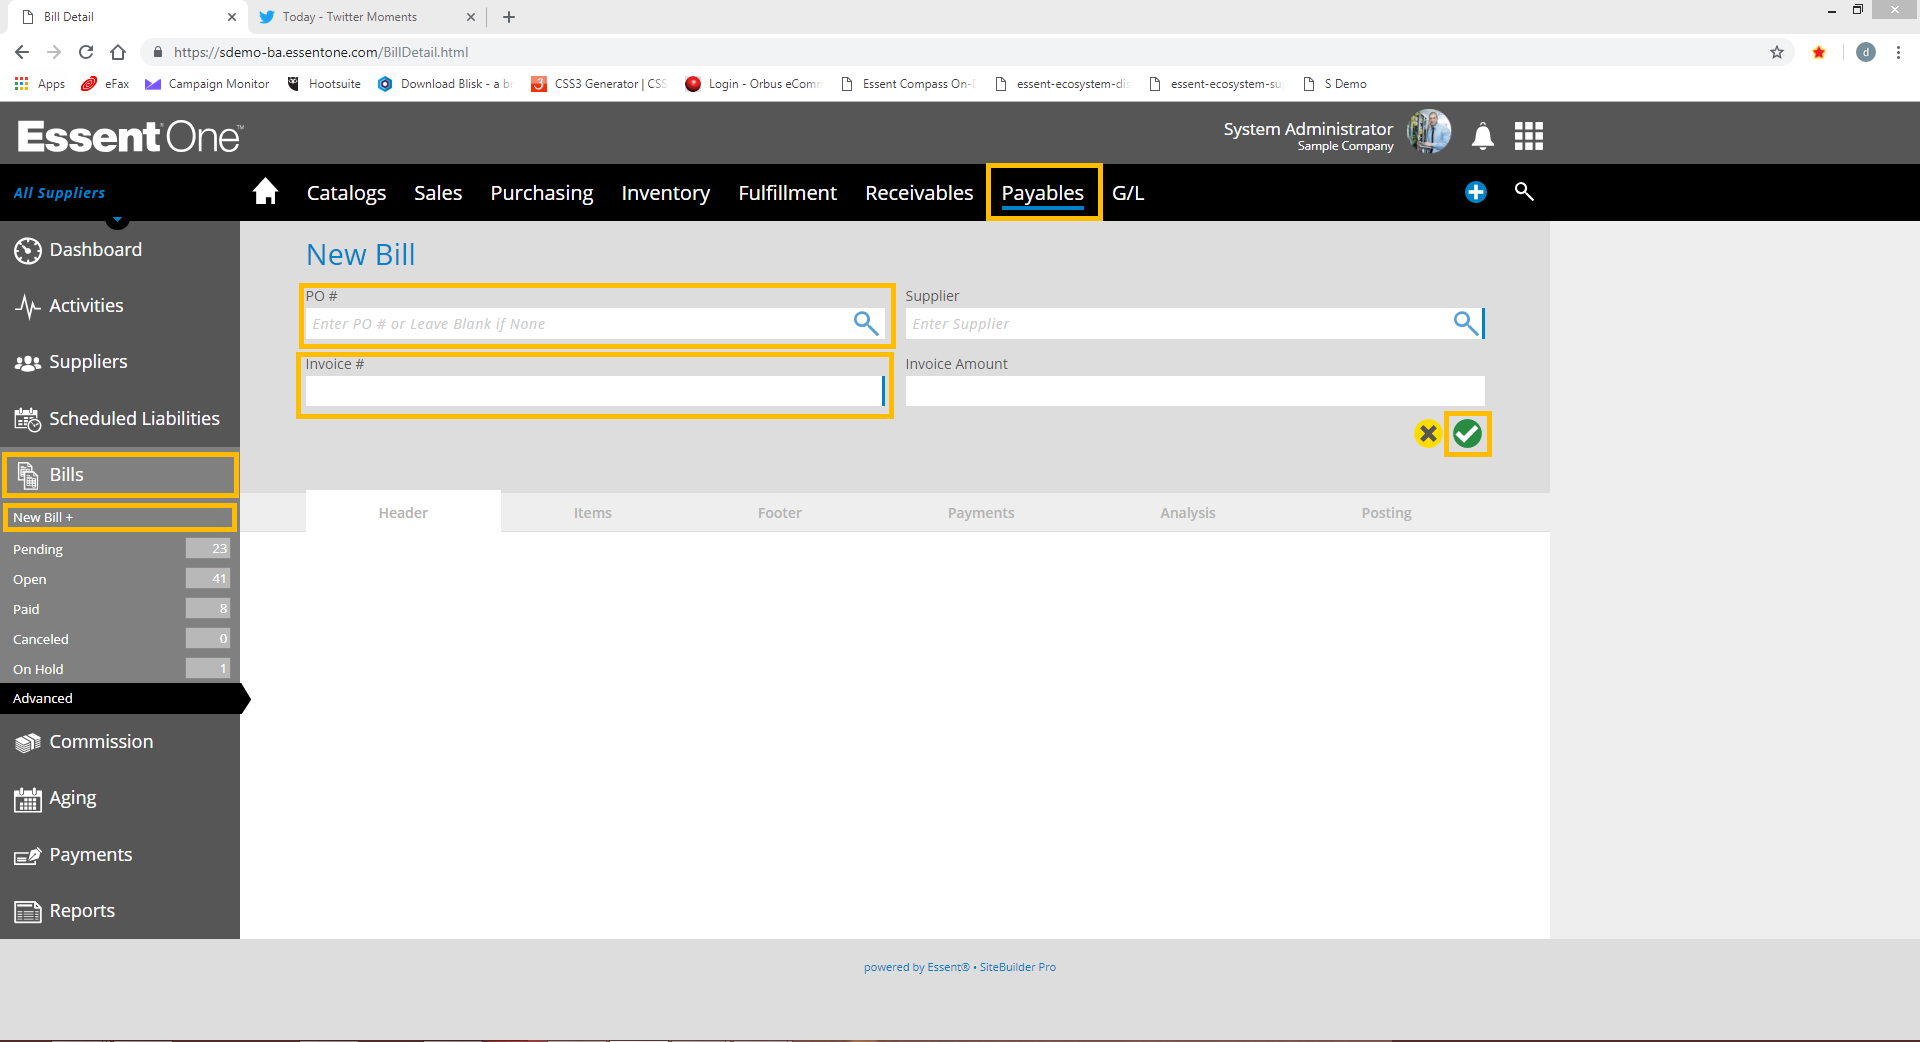
Highlighted are the Payables area, Bills menu, New Bill, the PO # field, the Invoice # field, and the approval button.
Choose Payables from the Area Bar. Optionally check out the Menus in the Menu Bar to see what's available.
Choose Bills from the Menu Bar. Then choose New Bill+.
Use the PO # field to link the PO we created earlier. Just type in the PO # and choose it when it pops up.
Enter an Invoice #. It can be any number. Choose the green checkmark and see that the data flowed in from the existing PO.
Check out each tab to see what's available.
Automatic Invoicing
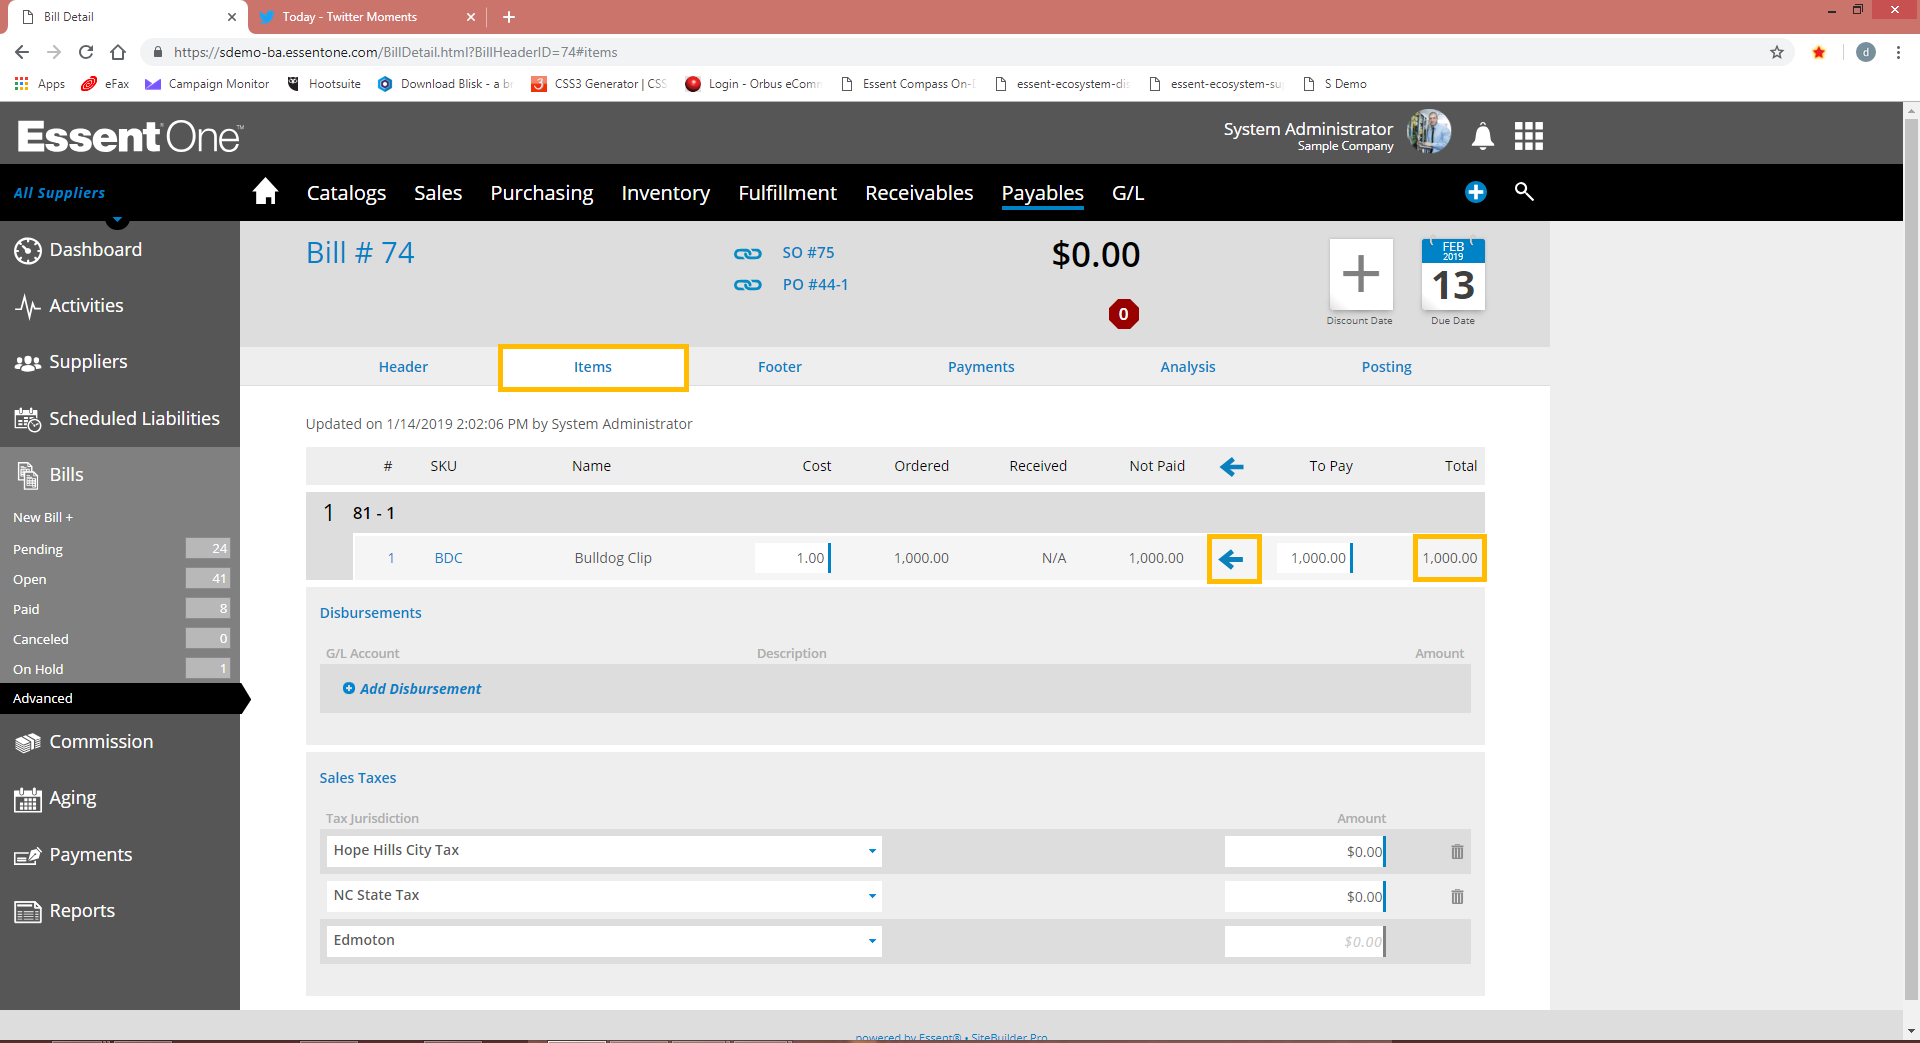
The Items tab, payment arrow, and the Total column are highlighted.
In the Items Tab, use the blue arrow to mark the line item for payment. Take note of the number in the Total column. We'll need it in a moment.
In the Header Tab, enter the Invoice Amount. It's the number we just noted from the Items Tab.
Finally, choose the Posting Tab and then Post Bill
How to Invoice
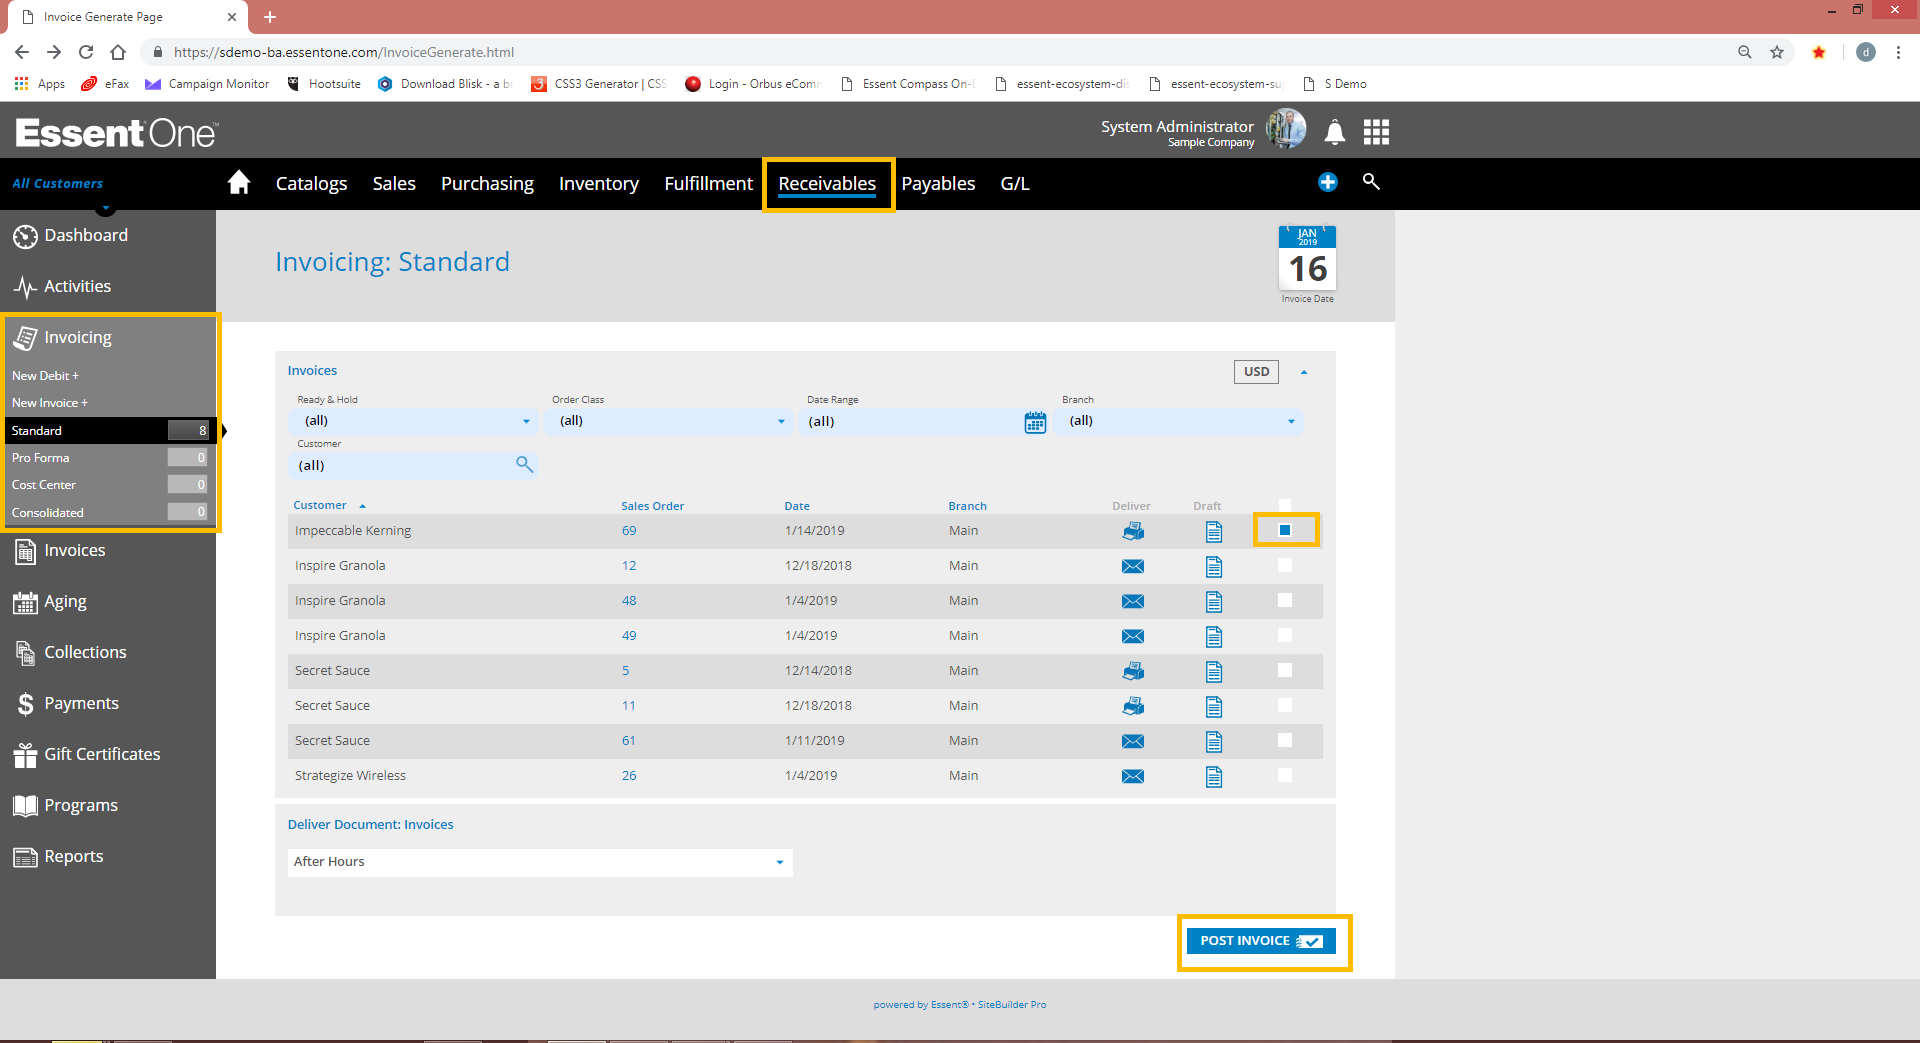
The Receivables area, Invoicing menu, Invoice check box, and Post Invoice button are highlighted.
Choose Receivables from the Area Bar. Optionally check out Menus on the Menu Bar to see what's available.
Choose Invoicing (which is separate from Invoices) from the Menu Bar. Sales Orders that are ready for invoicing are already populated.
Find the Sales Order you created earlier. If you don't remember or can't find it, that's okay; continue with any order listed and you will still see how it works.
Optionally click or tap the Draft icon in the Draft column to see the summary. Optionally check out the Tabs to see what's available.
Once again choose Invoicing from the Menu Bar. Use the check box in the rightmost column to choose your Invoice to post. Then use the Post Invoice button to post it.
© Copyright 2021 Essent Corporation. All Rights Reserved. Essent, the Essent Logo, and OrderTrax are registered trademarks of Essent Corporation and EssentOne, Compass, Direct2Decoration, PunchOutNow, SiteBuilder, Well-Formed orders, and Fast-Track integration are trademarks of Essent Corporation. Other marks are held by their respective owners. Information subject to use under one or more Essent terms and conditions. No warranty either expressed or implied. Product images are for illustration purposes only.